Secret Lives Greyish Blue Press-On Nails with 3D Bow: A Glamorous At-Home Manicure
Secret Lives Greyish Blue Press-On Nails with 3D Bow: A Glamorous At-Home Manicure
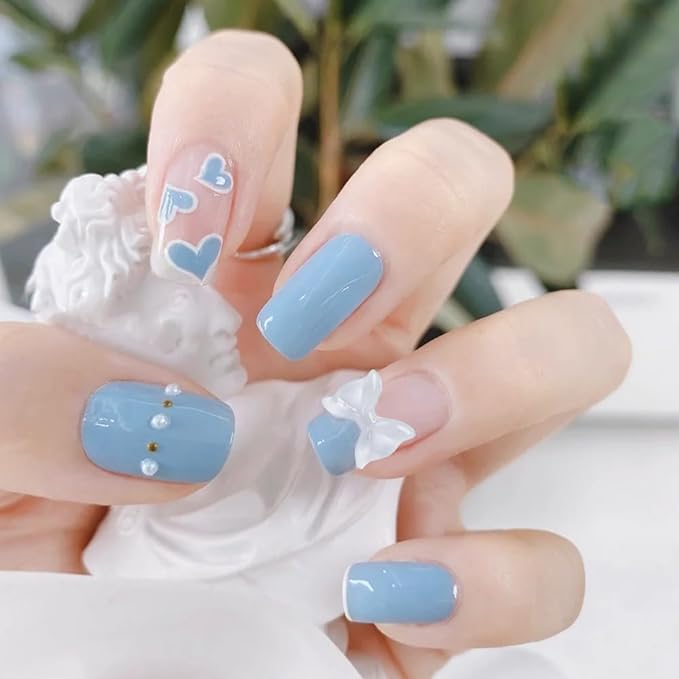
Longing for salon-quality nails but don't have the time or budget for regular appointments? Look no further than Secret Lives' acrylic press-on nails in a stunning greyish blue hue adorned with a delicate 3D bow and white pearl accents. This 24-piece set with a complete application kit empowers you to achieve a glamorous manicure in the comfort of your own home.
This article dives deep into the Secret Lives Greyish Blue Press-On Nails, exploring their features, application process, removal tips, and answering all your burning questions.
Unboxing the Secret Lives Greyish Blue Press-On Nails
The Secret Lives Greyish Blue Press-On Nails arrive in a sleek and stylish box, hinting at the elegance waiting inside. Upon opening it, you'll be greeted by 24 individual press-on nails in various sizes to ensure a perfect fit for all fingernail shapes. The greyish blue color is truly captivating – a subtle blend of grey and blue that exudes sophistication. The star of the show is undoubtedly the 3D bow embellishment. Delicately crafted and adorned with a single white pearl, it adds a touch of whimsy and dimension to the design.
Additional Contents of the Kit
Along with the press-on nails themselves, the Secret Lives kit comes equipped with everything you need for a flawless application:
- Mini nail file: This allows you to gently buff and smooth your natural nails before application for better adhesion.
- Alcohol wipe: Ensures your nails are clean and free of oils for optimal bonding.
- Cuticle pusher: Helps gently push back your cuticles for a more polished look.
- Nail glue: The glue provided is specifically formulated for press-on nails, ensuring a long-lasting wear.


Application Process: A Step-by-Step Guide
Here's a breakdown of the application process for your Secret Lives Greyish Blue Press-On Nails:
- Prep your nails: Wash your hands thoroughly and dry them completely. Gently push back your cuticles using the provided cuticle pusher.
- File and buff your natural nails: Using the mini nail file, lightly buff the surface of your natural nails to remove any shine and create a slightly rough surface for better adhesion.
- Cleanse your nails: Wipe each nail with the alcohol wipe to remove any oils or debris that might hinder the glue's effectiveness.
- Choose the perfect size press-on nail: Lay out all the press-on nails and find the ones that best fit each of your natural nails. It's better to have a slightly smaller size than one that's too big.
- Apply the nail glue: Apply a thin layer of nail glue to the back of the chosen press-on nail.
- Position and press: Starting at the base of your cuticle, gently press the press-on nail onto your natural nail and hold firmly for 15-20 seconds.
- Repeat for all nails: Once you've secured all the press-on nails, gently press down on each one again to ensure a strong bond.
- Shape and refine (optional): If desired, you can use nail clippers to slightly trim the press-on nails to your preferred length. You can also use the nail file to gently smooth any rough edges for a flawless finish.
Tips for Flawless Application
- Don't apply excess glue: A thin layer of glue is sufficient for a strong hold. Too much glue can lead to a messy application and make removal more difficult.
- Press firmly: Ensure you press the press-on nail firmly onto your natural nail for a secure bond. Hold each nail for at least 15-20 seconds.
- Avoid water for a few hours: After application, avoid exposing your nails to water for at least a couple of hours to allow the glue to cure completely.
Long-Lasting Wear and Removal Process
With proper application, you can enjoy your Secret Lives Greyish Blue Press-On Nails for up to a week or even longer. Here's how to remove them gently:
- Soften the glue: Soak your nails in warm water with mild soap for a few minutes. This will help loosen the glue bond.
- Gently pry the press-on nail: Don't force the removal. Use an orangewood stick (or a similar tool) to gently pry the press-on nail off your natural nail, starting from the edges and working your way towards the center.
- Buff and moisturize: Once all the press-on nails are removed, gently buff your natural nails to remove any leftover glue residue. Apply moisturizer


Comments
Post a Comment